nullrecon

Chill, Coffee and Cyber

  • How I Passed AZ-500: Microsoft Azure Security Technologies

    If you have hands on experience with Azure and it’s associated components, AZ-500 can be cleared in few weeks preparation. I have worked with Azure AD, Defender, Purview, Intunes and passed AZ-500 in second attempt since the first attempt was free of cost from our company. Additionally, Microsoft has announced open book exam. Unfortunately, I was unaware of the fact and the proctor advised not to use the Microsoft Learn link. Note that the exam has been structured in a way that if someone has to refer through the documentation for answering all the questions, they won’t be able to complete the exam on time. However, access to MS Learn during exam can be helpful to not memorize zero value arbitrary information.

    Prerequisite

    The below listed are not prerequisites from Microsoft but are the topics I covered which helped my AZ-500 preparation.

    AZ-500 Learning Path

    • Go through the 4 Modules as listed in the official exam page
    • Setup labs in Azure utilizing free credit provided for new accounts. Repeat the labs twice if possible. It is very beneficial as the questions are structured to test your hands-on experience.
    • Watch these Exam readiness videos. Identify the gaps and learn.
    • The latest comprehensive AZ-500 syllabus can be found here. Identify the gaps and learn.
    • Practice Assessment Test

    TLDR: The free resources from Microsoft Learn was sufficient and utilize the Azure free lab time efficiently.
  • Setup a SIEM at the lowest cost with this guide

    In the following guide we will discuss how to configure a SIEM using ELK Stack.

    How to configure a SIEM at free of cost or the least expenses? How to configure a SIEM without any shackles of license cost?

    How to configure elasticsearch, kibana and logstash as a SIEM?

    1. Ubuntu Host Setup

    The following section will guide you to prepare an ubuntu server for ELK setup:

    Essential package installation:

    Hardening of the host:

    • Disabled root ssh login
    • Enable ssh login with ssh key
    • Enable ufw firewall and allow only required ports

    Mount additional SSD for storage:

    • Find the mount name: $ lsblk
    • Find UUID of the mount: $ blkid /dev/sdXX
    • Partition and format if UUID is not assigned:
         $ fdisk /dev/sdXX
         $ mkdf.ext4 /dev/sdXX
    • Add the details to fstab for persistant hard disk:
        $ sudo nano /etc/fstad
      /dev/sdb1 /disk1 ext4 default 1 2

    2. Installation of ELK (elasticsearch, logstash, kibana)

    In the following section, we will discuss on the configuration of elasticsearch, logstash and kibana. We will layout the arious configuration changes to be done in the config files. The version we are working on currently is 7.12.

    cluster.name: nullcluster
    network.host: 0.0.0.0
    http.port: 9200
    node.name: elasticsrv01
    path:
        data:
               /mnt/hdd1/elasticsearch

    yml file configuration

    *nat
    :PREROUTING ACCEPT [0:0]
    :POSTROUTING ACCEPT [0:0]
    -A PREROUTING -p tcp –dport 443 -j REDIRECT –to-port 5601
    COMMIT

    $ sudo nano /etc/logstash/conf.d/20_metricbeat.yml

    input {   beats {     port => 5056     ssl => true     ssl_key => ‘/etc/logstash/config/certs/logstash.pkcs8.key’     ssl_certificate => ‘/etc/logstash/config/certs/logstash01.crt’   } } output {   elasticsearch {     hosts => [“https://<domain name>:9200”]     cacert => ‘/etc/logstash/config/certs/ca.crt’     user => ‘logstash_internal’     password => ‘***’     index => “%{[@metadata][beat]}-%{[@metadata][version]}”   } }
    • Configuration of heartbeat through logstash:

      $ sudo nano /etc/logstash/conf.d/01_heartbeat.conf
    input {   beats {     port => 5055     ssl => true     ssl_key => ‘/etc/logstash/config/certs/logstash.pkcs8.key’     ssl_certificate => ‘/etc/logstash/config/certs/azlogstash01.crt’   } } output {   elasticsearch {     hosts => [“https://<domain name>:9200”]     cacert => ‘/etc/logstash/config/certs/ca.crt’     user => ‘logstash_internal’     password => ‘***’     index => “%{[@metadata][beat]}-%{[@metadata][version]}”   } }  

    3. Enabling security

    In the following section, we will discuss how to accomplish secured access of kibana, elasticsearch and to ensure encrypted transmission of logs from beats agent to the log parsers.


    $ sudo nano /etc/elasticsearch/elasticsearch.yml

    “`
    xpack.security.enabled: true
    xpack.security.transport.ssl.enabled: true

    “`

    xpack.security.http.ssl.enabled: true xpack.security.http.ssl.key: certs/elasticsrv01.key xpack.security.http.ssl.certificate: certs/elasticsrv01.crt
    xpack.security.http.ssl.certificate_authorities: certs/ca.crt
    xpack.security.transport.ssl.key: certs/elasticsrv01.key
    xpack.security.transport.ssl.certificate: certs/elasticsrv01.crt
    xpack.security.transport.ssl.certificate_authorities: certs/ca.crt
    xpack.security.transport.ssl.verification_mode: certificate

    4. Configuration of observability module of elastic

    5. Alerting of elastic incidents using free module

    6. Forwarding checkpoint firewall logs to elasticsearch

    output.elasticsearch:   # Array of hosts to connect to.  
    hosts: [“https://<domain name>:9200”]  
    username: “elastic”   password: “***”  
    ssl:    certificate_authorities: [“/etc/filebeat/config/certs/ca.crt”]   
    verification_mode: “certificate”  
    indices:    – index: “filebeat-%{[agent.version]}-%{[event.module]:other}”


    setup.template.enabled: true
    setup.template.name: “filebeat-%{[agent.version]}”
    setup.template.pattern: “filebeat-%{[agent.version]}-*”
    setup.template.fields: “fields.yml”
    setup.template.overwrite: false
    setup.ilm.enabled: false # we handle ILM in the cluster, so not defined here
    • Creating Alias
    PUT filebeat-7.12.0-checkpoint-000001{  “aliases”: {    “filebeat-7.12.0-checkpoint”: {      “is_write_index”: true    }  }}  
    • Define ILM policy `filebeat-checkpoint-policy`:
    • Create high-order template and assign to the ILM policy:
    PUT _template/filebeat-7.12.0-checkpoint-ilm{  “order”: 50,  “index_patterns”: [    “filebeat-7.12.0-checkpoint-*”  ],  “settings”: {    “index”: {      “lifecycle”: {        “name”: “filebeat-checkpoint-policy”,        “rollover_alias”: “filebeat-7.12.0-checkpoint”      }    }  }}  
    cp_log_export add name elasticlive_filebeat_exporter \
    target-server 10.8.9.153 \
    target-port 9520 \
    protocol udp \
    format syslog \
    –apply-now

    7. WARM HOST Configuration:

    The Warm host can be utilized when we have data that are to be archived and are not required immediately. A general rule of thumb is to transfer data older than 3 days or more to a host with lesser configuration WARM host.

    • Configuration changes:
    node.name: extranode01
    discovery.seed_hosts: [“<domain name 1>”,]
    cluster.initial_master_nodes: [“elasticsrv01”]
    node.attr.box_type: warm
    • Renaming/Re-indexing pre-existing indexes:
    PUT filebeat-7.12.0-checkpoint-backup {     “settings” : {         “index” : {             “number_of_shards” : 1,             “number_of_replicas” : 0         }     } }


    PUT filebeat-7.12.0-checkpoint-backup/_settings { “index.routing.allocation.require.temp”: “warm” }     POST /_reindex {   “source”: {     “index”: “filebeat-7.12.0-checkpoint”   },   “dest”: {     “index”: “filebeat-7.12.0-checkpoint-backup”   } }    

    8. Disk allocation changes:

    1. Configuration:
      Explanation: https://www.elastic.co/guide/en/elasticsearch/reference/6.8/disk-allocator.html

      To obtain the current configuration details
      GET _cluster/settings?include_defaults&flat_settings


    To change the disk allocation:

    PUT _cluster/settings {   “transient”: {     “cluster.routing.allocation.disk.watermark.high”: “95%”   }
    }

    ANNEXURE A: COMMON COMMANDS FOR TROUBLESHOOTING

    • Linux
      – to monitor last logs:
      $ tail -f /var/log/elasticsearch/elk.log
    • Metricbeat windows
      > .\metricbeat.exe setup -e -d “*”
      > .\metricbeat.exe modules list
    • Elastiflow
      $ netstat -su
      $ tcpdump port 2055
    • Heartbeat
      $ heartbeat -c heartbeat.yml -e -v
      $ heartbeat -e                                   //to send the output to standard
  • How can we mitigate email spoofing and email threats?

    In the following post, I will be listing down various security measures to assist us from email based threats. Most of the following email security mechanisms can be implemented for free or minimal cost. However, most of the modern solutions from vendors like Microsoft, Mimecast makes the administration job easier and reduces the mean time to respond.

    Following are the different email security mechanisms that can be used to mitigate email threats:

    • Email envelope spoofing: SPF
    • Email header spoofing: No one mechanism is sufficient so SPF + DMARC, or DKIM + DMARC, or SPF + DKIM + DMARC
    • Display name spoofing: Advanced threat filters, transport rules, and user awareness
    • Compromised mailboxes or “legitimate: senders: Advanced threat filters, transport rules, and user awareness
    • Malicious URLs: Web filter, web proxy
    • Malicious Attachments: Sandboxing, Extension Whitelists

    Email Security Mechanisms with Definitions:

    Sender Policy Framework (SPF)

    SPF is a DNS TXT record that contains a list of servers from which they send emails. We include the IP addresses of all the SMTP servers and other server like certain web servers that are likely to send emails to the SPF records. The idea is that when a receiving server receives an email from their domain, checks the list of legitimate sources using SPF, and verifies if the received email was legitimate or not.

    DomainKeys Identified Mail (DKIM)

    DKIM is a key-pair signing mechanism for the header of mail messages. When you send an email, our authorized SMTP server attaches a signature to the message using a private. The private key is then compared to the public key published in DNS of your domain and adds authenticity on the receiving end.

    Domain Message Authentication Reporting & Conformance (DMARC)

    DMARC record like the above is another TXT record in DNS which tries to make up for the weaknesses in both SPF and DKIM. If either DKIM or SPF alignment passes DMARC evaluates as a “PASS” or known as DMARC “alignment”. DMARC alignment is only enforced when your policy (p=) is set to “reject” or “quarantine”.

  • How I Passed OSCP with 90% score – Roadmap, Tips and Tricks

    It was a long journey from being a teenager cracking Wi-Fi using BackTrack Linux (old name of Kali Linux) to acquiring OSCP certification after trying my hand in electronics, networking and system administration. I had to pick up from the very basics of penetration testing and have finally acquired this professional red teaming certification.

    What helped me was the several other blogs, experiences, resources and personnel interactions before taking up this challenge. I am documenting my journey and curating resources so that this will be helpful for someone out there.

    Learning Roadmap:

    Listing all the resources and materials I utilized.

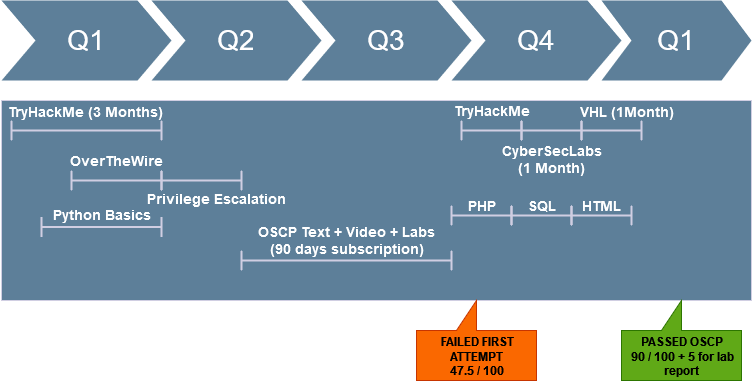
    1. TryHackMe
      THM has an “Offensive Pentesting” learning path which is ideal for a beginner and helped me get an idea of what to expect on the OSCP journey.
    1. OverTheWire | UnderTheWire | Specifically Bandit and Natas
      Fantastic web based games to cover the basics and create a foundation on Linux and Windows.
    2. Web Application Pentesting Basics
    3. Basics of Scripting Languages
    4. Nail Privilege Escalation
    5. Purchased OSCP Labs for 90 days | Started documenting the labs and the exercises for 5 points
    6. Nail Buffer Overflow
    7. CyberSecLabs
      Easier lab machines but great for practicing and needed it to motivate me after my failed attempt.
    8. Offensive Security Proving grounds
      First, do about 20 Play machines (easy/intermediate) then another 20 machines in the Practice category. The plan was to complete 40 machines but purchased VHL midway through.
    9. VirtualHackingLabs
      VHL is on the expensive side of the labs but was well worth the investment. Highly recommended to perfect your enumeration methodology.
    10. Read/Watch on Retired Boxes || https://www.hackthebox.eu/home/machines/retired
    11. Watch YouTube machine walkthroughs by ippsec

    Online resources, cheatsheets for reference

    IMHO the below 3 cheatsheets cover pretty much everything that will be required to pass the OSCP exam. The smartest way is to create your cheatsheet using joplin/cherrytree/onenote.

    You may download the cheatsheet I used to pass OSCP from the sidebar widget. It was created using Joplin.

    Mindmap to crack any machine

    The below mindmap along with the cheatsheet provided a step by step assistance to crack every machine. Feel free to duplicate it.

    Link: https://whimsical.com/target-machine-ip-23aVmgehajqmAvT9cH4q2K

    Pre-Exam Plan

    • Only applicable for OSCP aspirants from the United Arab Emirates due to the throttling of OpenVPN packets, setup a solid VPN tunnel using VPS or other alternatives. Stay tuned as I will post how I managed to do it using pfSense firewall.
    • Read the official exam guide and create a plan, checklist for every phase of the journey. I have left a sample in the joplin cheatsheet.
    • Have a disaster recovery plan for internet/router, machine/laptop, kali virtual machines(snapshots, 3-2-1 backups), webcam, national identification cards.

    Exam Mindset and Plan

    • Choose an exam timing that doesn’t hinder your normal sleep cycle.
    • Enumeration is key. Enumerate as much as possible horizontally before moving vertically.
    • Write down machine IP addresses in a sticky note, add a bookmark in the browser, whitelist the IP addresses in burp etc
    • Create your own 5 machine order and stick to the plan. The most popular one is starting with BOF (Buffer Overflow) machine while the scans for other machines run in the background. I started with 25 points since I will at my sharpest and BOF was set aside to when I was feeling least motivated or exhausted.
    • Set up a 2 or 3 hour timer for one host and take breaks every 45 minutes. Switch to a different machine if there is no progress within the time and reset the timer in case you obtain a low-level shell.
    • Keep in mind that non-25 point machines are 5 flags worth 10 points each. So plan for the metasploit usage accordingly.
    • Don’t touch metasploit until the last 3-6 hours of the exam. Note down or skip the probable metasploit exploits to the very last. Don’t be that guy who got disqualified due to using metasploit on two machines by mistake.

    Tools

    Skipping all the obvious tools in the OSCP texts.

    • Enumeration Automation : nmapAutomator or AutoRecon
    • pspy – allows you to see commands run by other users, cron jobs, etc. as they execute in real time
    • wappalyzer – GUI alternative to the command $whatweb
    • $wfuzz -u 'http://abc.html?file=FUZZ' -w <wordlist> -fuzz for LFI, an alternative for burp intruder
    • rlwrap – alternative to interactive shells, will be handy with nc listener for windows machines $sudo rlwrap nc -lnvp 443
    • Static Binaries like netcat etc – can be utilized on machines that don’t have netcat installed by default
    • BruteX – automatically brute force all the available services

    Tricks

    FAQs

    • How do you know you’re ready for the exam?
      You will never feel ready and it is difficult to gauge. A general rule of thumb is whenever you are able to crack most machines in under 4 hours.
    • How much did you spend for acquiring OSCP?
      An approximate total of USD 1678 = 90 days of OSCP ($1349) + Exam retake fees ($150) + 4 months of TryHackMe ($40) + 1 Month of CyberSecLabs ($10) + 1 Month of VirtualHackingLabs ($99) + Tib3rius udemy privilege escalation course ($30)
    • Will the OSCP texts, videos and the lab suffice to pass the exam?
      I will suggest against relying only on the OSCP resources.